List of main functions
Trade. Allows you to perform trading operations in one click:
- Open pending orders and positions with automatic risk calculation.
- Open multiple orders and positions with one click.
- Open order grid.
- Open orders on multiple symbols with one click.
- Close pending orders and positions by groups.
- Reversal of the position (close Buy > open Sell and close Sell > open Buy).
- Locking a position (equalize the volumes of Buy and Sell positions by opening a position with the missing volume).
- Partial closing of all positions with one click.
- Setting take profit and stop loss for all positions at the same price level.
- Setting stop loss for all positions to the breakeven level of the position.
When opening orders and positions, the following functions can be applied:
- Distribution of the calculated volume between several orders or positions (when opening several orders and positions with one click).
- Visualization of trading levels of the future order on the chart.
- Cancel opening a position if the current spread exceeds the specified one.
- Automatic ratio between take profit and stop loss.
- Virtual stop loss and take profit.
- Automatic increase of stop loss and take profit by the size of the current spread.
- Calculation of take profit and stop loss based on the ATR indicator readings.
- Setting the expiration date of a pending order.
- Trailing for a pending order (a pending order automatically moves following the current price).
- The ability to manage orders and positions opened from a mobile terminal (phone).
Risk manager and trading report. Allows you to analyze your trading history:
- Displays the trading history on the chart. Allows you to choose which trades to display on the chart, all trades, only Buy, Sell, Profitable, Loss positions.
- Generates a trading report for the current symbol or the entire account.
Allows you to control the risk on your trading account:
- Shows profit per day, week and month.
- Limits daily, weekly and monthly loss.
- Limits daily, weekly and monthly profits.
- Limits the number of trades per day.
When the limit is reached, the panel can:
- Display messages on the chart, send notifications to the phone or send an email.
- Close all positions and pending orders.
- Lock positions (equalize the volumes of Buy and Sell positions by opening a position with the missing volume).
- Close the terminal until the next day.
OCO orders. Allows you to create OCO orders.
An OCO order is two pending orders linked by a mutually canceling function: when one order is executed, the second order is deleted.
Closing orders and positions. Allows you to close all pending orders and positions if the total profit or loss of the positions reaches a specified value:
- Can close orders and positions on the current symbol or on the entire account.
- Can take into account the profit on Buy+Sell positions, or only Buy, or only Sell.
- Can close all positions and orders, or only selected types.
Tasks. Allows you to set deferred tasks for opening and closing orders and positions:
The task is activated when the specified time is reached, when the price touches the task line, or when another task is activated.
The task can open or close any type of orders and positions.
Trailing stop function. Allows you to set the trailing stop function for a position (moving the stop loss towards profit according to a certain algorithm).
- 7 types of trailing stop.
- Has a “Start” function.
- You can use a virtual stop loss.
Break-even function. Allows you to set a break-even function for a position (move stop-loss to the position opening price when a specified profit is reached):
- The number of break-even levels per position is unlimited.
- Allows you to set an indent from the position opening price to the stop-loss price.
- You can use a virtual stop-loss.
- Allows you to set the distance in one of four measurement options: in points, as a percentage of stop-loss, as a percentage of take-profit, or price.
Partial close function. l Allows you to set the partiaclose function for a position (close part of the position when a specified profit or loss is reached):
- The number of partial close levels per position is unlimited.
- Allows you to set the close volume in one of three measurement options: fixed lot size, % of the current lot size, % of the initial lot size.
- Allows you to set the distance in one of five measurement options: in points, in stop loss percentage, in take profit percentage, price, points+trailing.
Alert. Allows you to set an alert that will trigger when the price touches a specified line or reaches a specified time.
Alerts can be displayed on the chart and in messages sent to email or mobile.
Chart management. Allows you to switch symbols on terminal charts and analyze symbol data:
- You can create up to 4 lists with symbols. The list of symbols and its name is set by the user.
- You can select a symbol to Favorites.
- A separate list of symbols that have open orders and positions.
- Buttons with a symbol can be highlighted in any color.
Information panel. Shows current information about the symbol:
- Spread.
- Time until the bar closes.
- Profit on the current symbol.
- Number of positions and their trading volume.
- ATR indicator readings.
- ATR indicator power reserve.
- Break-even price for positions on the current symbol.
Orders and positions management. Allows you to manage order and position settings:
- Edit stop loss and take profit.
- Edit virtual stop loss and take profit.
- Edit trailing stop function.
- Edit breakeven function.
- Edit partial close function.
- Full or partial position closure.
- Automatically delete a pending order at a specified time or price.
Order grid management. Allows you to manage the order grid settings:
- Edit stop loss and take profit for all orders in the grid.
- Edit virtual stop loss and take profit for all orders in the grid.
- Set the trailing stop function for the order grid.
- Set the breakeven function for the order grid.
- Full or partial closure of the order grid.
Toolbar
- Collapse toolbar.
- Settings.
- Chart screenshot. Settings and screenshot storage location here.
- Order control panel.
- Risk manager and Trading report.
- Info panel.
- Chart control panel.
- Trading.
- OCO orders.
- General order closure.
- Tasks.
- Trailing stop.
- Breakeven.
- Partial closure.
- Alerts.
- Server time. Using settings you can change the displayed information to:
- Server time | Time until bar closes
- Profit in currency
- Profit in points
- Profit in currency | Profit in points
- Profit in currency | Volume of open positions
- Show/hide Toolbar.
- Collapse toolbar.
Panel for Trade
“Open” tab
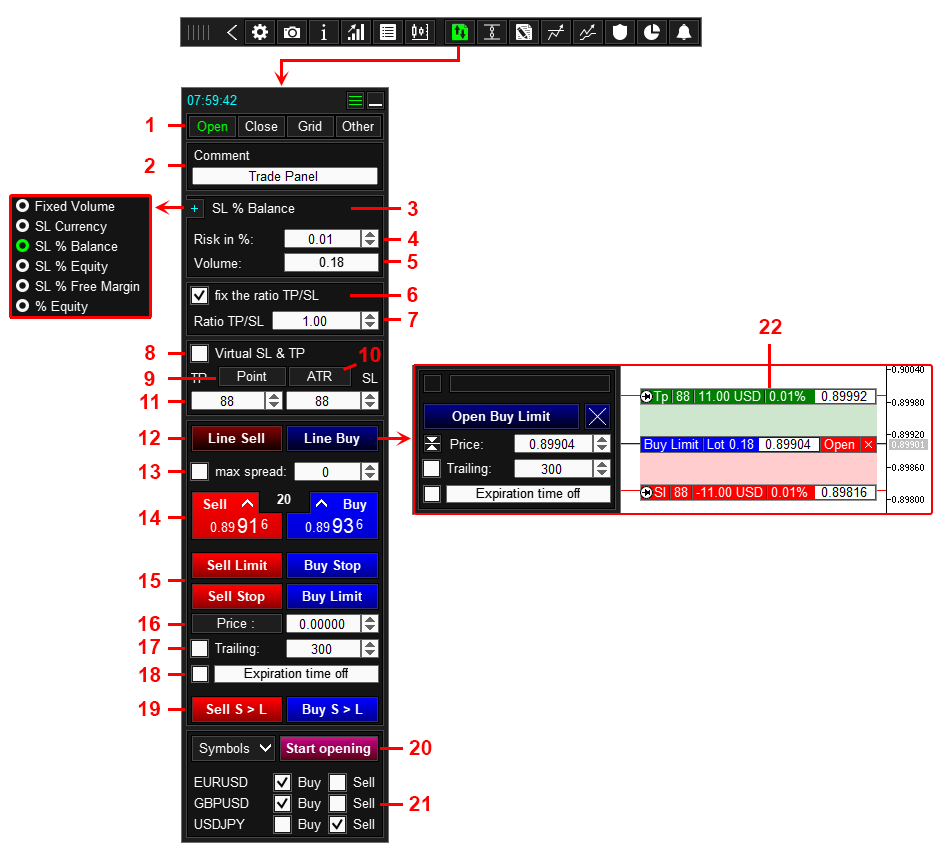
- Buttons for switching tabs. The number of tabs, their names and contents are configured here.
- Comment to the order.
- The method for calculating the order volume.
- The risk size or the order volume, with the Fixed Volume method.
- The calculated volume according to the specified risk.
- Fix the ratio of Take Profit to Stop Loss. The ratio function is applied as follows:
- if you change the SL size, the panel will automatically change the TP size according to the following formula: TP = SL * Ratio,
- if you change the TP size, the panel will automatically change the SL size according to the following formula: SL = TP / Ratio.
- The size of the ratio between Take Profit and Stop Loss.
- Open an order with Virtual Stop Loss and Take Profit.
- Button for switching the unit of measurement of Take Profit and Stop Loss (Points/Price).
- Use the ATR indicator readings for the size of Take Profit and Stop Loss. When you click the button, the panel will set the size of Take Profit and Stop Loss equal to the value of the ATR indicator. The function is configured here.
- Take profit and Stop loss in points or price (depending on the position of button 9).
- Buttons for switching to the order opening mode using labels on chart 20.
- Maximum spread filter. If the current spread exceeds the specified one when the position opening button is pressed, the position opening will be canceled.
- Buttons for quickly opening positions.
- Buttons for quickly opening pending orders.
- Price for opening a pending order (for buttons 15). Can be set in points (distance from the current price to the pending order price), to do this, click on the “Price:” button.
- Pending order trailing. The panel will move the pending order following the current price. The distance between the price and the pending order is specified in the input field. The panel moves the pending order only in the direction of the current price.
- Expiration of the pending order. The time upon reaching which the pending order will be deleted.
- Button for switching to the BuyStopLimit SellStopLimit order opening mode (MT5 only).
- Button for opening orders for the specified symbols with one click. When you click the Start opening button, the Panel will sequentially open the orders specified in the list 21. Orders are opened using the functions of the Buy/Sell buttons (14), so the orders will have the same parameters and functions that the order would receive when clicking the Buy/Sell buttons (14) for the corresponding symbol.
- List of symbols for which orders will be opened when the Start opening button is pressed. The list of symbols is configured here.
- Labels for opening an order. Used to open an order using lines on the chart. Designed to visualize the location of trading levels on the chart, ensures their accurate installation on support and resistance levels. Configured here.
Volume calculation method
The lot for a new order is calculated in one of six ways:
| Method | Description |
|---|---|
| Fixed lot | The panel does not calculate the lot. When opening an order, a fixed lot size specified by the user is used. |
| SL in currency | Risk in the deposit currency (for example $200). * |
| SL in % of balance | Risk as a percentage of balance. * |
| SL in % of equity | Risk as a percentage of the equity. * |
| SL in % of free margin | Risk as a percentage of free margin. * |
| % of equity | The lot is set as a percentage of equity. The utility automatically recalculates the lot every time the equity size is changed. |
* The lot size is calculated in such a way that the loss from closing a position by stop loss will be equal to the specified risk value. The utility calculates the lot itself, the trader only needs to set the risk value.
Example:
Lot calculation method: SL in % of balance.
Risk per trade: 3%.
Current balance: $1,000.
With the specified parameters, the loss from a trade when closing it by stop loss will be: $1,000 * 3% = $30.
Volume calculation is configured here.
Virtual Stop Loss and Take Profit
Virtual stop loss and take profit are price levels tied to an order (position). When the current price touches these levels, the position will be closed. Virtual stops perform the same functions as regular stops, they allow you to fix a loss and profit.
What are virtual sl and tp for?
The only purpose of virtual stop loss and take profit is to hide them from the broker. The broker does not see virtual sl and tp and therefore will not be able to knock them out by manipulating the price.
Why does the broker not see virtual sl and tp?
Stop loss and take profit (let’s call them real sl and tp) are stored on the broker’s trading server and are executed by the trading server. Accordingly, the broker knows the location of the stop loss and take profit. Virtual sl and tp are stored in the panel and are executed by the panel. The panel itself monitors the current price, and if the price touches the virtual sl or tp, the panel itself will close the position.
Disadvantages of virtual sl and tp:
- Since virtual sl and tp are executed in the terminal, price slippage is possible when closing a position.
- Since virtual sl and tp are executed by the panel, they will not work if the terminal or panel is turned off.
Virtual stop loss and take profit are configured here.
How to open a position
Method #1:
- Enter the required parameters: Comment 2, Risk calculation type and risk size 3,4. If you want to replace real TP and SL with virtual ones, enable check 8.
- Click the “Line Sell” button if you open Sell or “Line Buy” if you open Buy 12.
- Using labels 20 or fields 11, set the TP and SL prices. If necessary, use the fixed ratio of 6,7, button 9 to switch Price / Point, button 10 if you want to use the ATR indicator as TP and SL.
- Enable function 13 if you want to open a position only if the current spread is less than the specified one.
- Click the Open Sell or Open Buy button.
Method #2:
- Enter the required parameters: Comment 2, Risk calculation type and risk size 3,4. If you want to replace real TP and SL with virtual ones, enable check 8.
- Enter TP and SL in fields 11. If necessary, use a fixed ratio of 6,7, button 9 to switch Price/Point, button 10 if you want to use the ATR indicator readings as TP and SL.
- Enable function 13 if you want to open a position only if the current spread is less than the specified one.
- Click the “Sell” or “Buy” button 14.
How to open a pending order
Method #1:
- Enter the required parameters: Comment 2, Risk calculation type and risk size 3,4. If you want to replace real TP and SL with virtual ones, enable check 8.
- Click the “Line Sell” button if you open Sell or “Line Buy” if you open Buy 12.
- Using labels 20 or fields 11 set the order opening price, TP and SL. If necessary, use the fixed ratio 6,7, button 9 to switch Price/Point, button 10 if you want to use the ATR indicator as TP and SL.
- Turn on trailing 17 if you want the pending order to follow the current price.
- Turn on expiration 18 if you want the pending order to be deleted at a specified time.
- Click the Open SellLimit/ SellStop or Open BuyLimit/ BuyStop button.
Method #2:
- Enter the required parameters: Comment 2, Risk calculation type and risk size 3,4. If you want to replace real TP and SL with virtual ones, enable the check 8.
- Enter the order opening price, TP and SL in fields 16 and 11. If necessary, use a fixed ratio 6,7, button 10 if you want to use the ATR indicator readings as TP and SL.
- Enable trailing 17 if you want the pending order to follow the current price.
- Enable expiration 18 if you want the pending order to be deleted at a specified time.
- Click the “SellLimit“, “SellStop“, “BuyLimit” or “BuyStop” button 15.
How to open orders on multiple symbols in one click
- Go to settings and create a list of symbols that will be used to open orders.
- Enter the required parameters for the order, on each symbol from the list (See the list of parameters above, in the How to open a position section).
- Go to the list of symbols (21) and set which symbol and which type of order to open.
- Click the Start opening (20) button.
- After clicking the Start opening button, the panel will open positions for symbols from the list 21. Opened orders will have the parameters and functions set for the symbol for which the order was opened.
“Close” tab
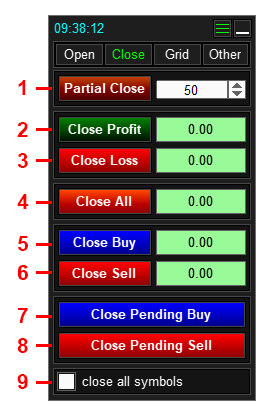
- Partially close all positions.
- Close profitable positions.
- Close unprofitable positions.
- Close all orders and positions.
- Close Buy positions.
- Close Sell positions.
- Close pending Buy orders.
- Close pending Sell orders.
- Apply close to all symbols.
How to close orders and positions
To partially close all positions, enter the % to close and click the 1 button.
To close orders and positions of a given type, click the 2, 3, 5, 6, 7 or 8 button.
To close all Orders and Positions, click the 4 button.
To make the panel apply closing of orders and positions to all symbols, enable the checkbox 9.
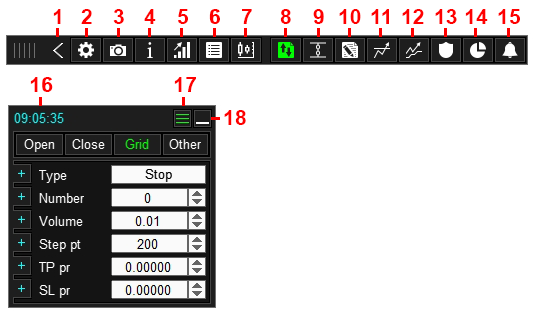
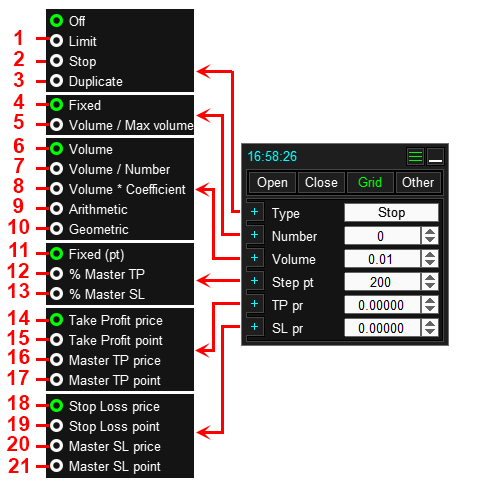
“Grid” tab
This tab (section) is an addition to the “Open” tab, and is designed to configure the order grid. The order grid will be created when opening an order from the “Open” tab.
Further for definition: Master order – is an order opened from the Open tab, this is the order starting from which the grid is built.
| # | Description | Example |
|---|---|---|
| 1 | Type: Limit– the order grid will consist of Limit orders. | The grid is placed in the direction of the order’s loss. |
| 2 | Type: Stop– the order grid will consist of Stop orders. | The grid is placed in the direction of the order profit. |
| 3 | Type: Duplicate – duplicate master order. | The panel will open the specified number of orders, at the price of the master order. The type of orders will be the same as the master order. |
| 4 | Number of orders: Fixed – the number of orders in the grid is fixed and is set by the user. | In the input field, we entered 5, so the order grid will contain 5 orders + master order. |
| 5 | Number of orders: Volume / Max. volume – this calculation method is used if the calculated volume of the master order is greater than the maximum volume set by the broker. If the calculated volume is greater than the maximum volume, the panel will distribute the calculated volume between several orders. The number of orders is calculated automatically. | The maximum allowed volume on the symbol is 100.00, The calculated volume of the master order is 258.00, When you click on the button, 3 orders will open: the first order with a volume of 100.00, the second order with a volume of 100.00, the third order with a lot of 58.00. |
| 6 | Order Volume: Volume – the volume of each grid order is fixed and is set by the user. | In the volume input field we entered 0.3, so each grid order will have a volume equal to 0.3. |
| 7 | Order Volume: Volume / Number – the calculated volume of the master order will be distributed equally between the orders (if necessary, the lot will be normalized). | The specified number of grid orders is 4, Calculated volume is 1.00, When you click on the button, 5 orders will open. Each order will have a volume of 0.20 lots (1.00/5). |
| 8 | Order volume: Volume * Coefficient – the volume of each grid order will be equal to the volume of the master order multiplied by the coefficient. | The calculated volume of the master order is 1.5, Coefficient 2, accordingly, each order in the grid will have a volume equal to 3.0 (1.5 * 2). |
| 9 | Order Volume: Arithmetic – the volume of each order in the grid will correspond to the arithmetic progression. | The calculated volume of the master order is 1.0, The specified number of grid orders is 4, The difference in the arithmetic progression is 1.5, accordingly, the grid orders will have the following volumes: 1# 2.5, 2# 3.0, 3# 4.5, 4# 6.0. |
| 10 | Order Volume: Geometric – the volume of each order in the grid will correspond to a geometric progression. | The calculated volume of the master order is 1.0, The specified number of grid orders is 4, The denominator of the geometric progression is 2.0, accordingly, the grid orders will have the following volumes: 1# 2.0, 2# 4.0, 3# 8.0, 4# 6.0. |
| 11 | Order grid step: Fixed (pt) – the order grid step is fixed and is set by the user in points. | In the step input field, we entered 100 pp, respectively, the distance between grid orders will be 100 points. If the grid step is 0, then the orders will be opened at the same price at which the master order was opened. |
| 12 | Order grid step: % Master TP – the order grid step will be equal to the specified part of the master order take profit. | Take profit of the master order is 2000 points, % Master TP 10%, accordingly the order grid step will be equal to 10% of 2000 = 200 points. |
| 13 | Order grid step: % Master SL – the order grid step will be equal to the specified part of the stop loss of the master order. | Stop loss master order 2500 points, % Master SL 10%, accordingly, the order grid step will be equal to 10% of 2500 = 250 points. |
| 14 | Take profit of the order grid: Take profit price – the take profit of each order is set at the price specified by the user. | In the price input field we entered 1.9453, accordingly the take profit of each grid order will be set at the price of 1.9453. |
| 15 | Take profit of the order grid: Take profit points – the take profit of each order is set at a distance specified by the user. | Take profit points – 100 points, The first grid order buy is opened at a price of 1.0000, the take profit of this order will be at a price of 1.0100, The second grid order buy is opened at a price of 0.9000, the take profit of this order will be at a price of 0.9100, The third grid order buy is opened at a price of 0.8000, the take profit of this order will be at a price of 0.8100. |
| 16 | Take profit of the order grid: Master TP price – the take profit of each order is set at the take profit price of the master order. | the master order has a take profit at a price of 1.9453, accordingly the take profit of each grid order will be set at a price of 1.9453. |
| 17 | Take profit of the order grid: Master TP points – the take profit of each order is set at the distance that the take profit of the master order has. | Take profit of the master order in points is equal to 100 points, respectively The first order of the buy grid opened at a price of 1.0000 will have a take profit at a price of 1.0100, The second order of the buy grid opened at a price of 0.9000 will have a take profit at a price of 0.9100, The third order of the buy grid opened at a price of 0.8000 will have a take profit at a price of 0.8100. |
| 18 | Stop loss of order grid: Stop loss price – the stop loss of each order is set at a price specified by the user. | In the price input field we entered 1.9453, accordingly the stop loss of each grid order will be set at the price of 1.9453. |
| 19 | Stop loss of order grid: Stop loss points – stop loss of each order is set at a distance specified by the user. | Stop loss points – 100 points, The first grid order buy is opened at a price of 1.0000, the stop loss of this order will be at a price of 0.9900, The second grid order buy is opened at a price of 0.9000, the stop loss of this order will be at a price of 0.8900, The third grid order buy is opened at a price of 0.8000, the stop loss of this order will be at a price of 0.7900. |
| 20 | Stop loss of order grid: Master SL price – stop loss of each order is set to the stop loss price of the master order. | the master order has a stop loss at a price of 1.9453, accordingly the stop loss of each grid order will be set at a price of 1.9453. |
| 21 | Stop loss of order grid: Master SL points – the stop loss of each order is set at the distance that the stop loss of the master order has. | Stop loss of the master order in points is equal to 100 points, respectively The first grid order buy opened at a price of 1.0000 will have a stop loss at a price of 0.9900, The second grid order buy opened at a price of 0.9000 will have a stop loss at a price of 0.8900, The third grid order buy opened at a price of 0.8000 will have a stop loss at a price of 0.7900. |
How to open multiple orders or positions in one click
- Set the number of additional orders or positions 3,4 and their volume 5-9.
- Set Step = 0 (10).
- Set the calculation method of TP and SL of additional orders or positions.
- Open a position or order according to the instructions above.
- After the position or order (master-order) is opened, the panel will open additional positions or orders. The type and price of the order or position opening will be the same as the master-order.
How to open an order grid
- Set the order grid type (Stop or Limit) 1,2.
- Set the number of orders in the grid 3,4 and their volume 5-9.
- Set the step between grid orders 10-12.
- Set the calculation method for TP and SL of grid orders.
- Open a position or order according to the instructions above.
- After a position or order (master order) is opened, the trading panel will open the order grid. The master-order will be the first order of the grid.
“Other” tab
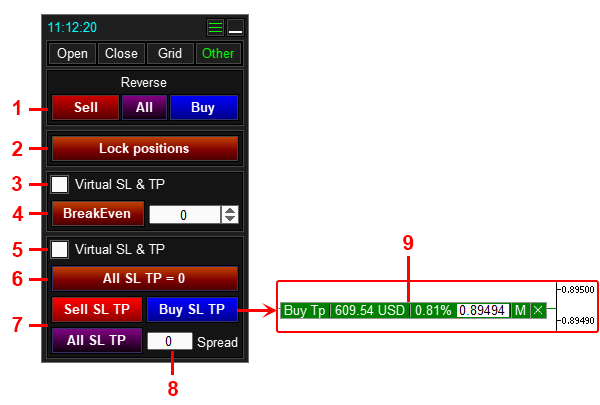
- Reverse positions:
- Sell– the panel will close all Sell positions and open one Buy position with a volume equal to the volume of closed Sell positions.
- Buy – the panel will close all Buy positions and open one Sell position with a volume equal to the volume of closed Buy positions.
- All – the panel will close all Buy and Sell positions, open one Sell position with a volume equal to the volume of closed Buy positions, open one Buy position with a volume equal to the volume of closed Sell positions.
- Lock positions. The panel will open an additional position that will make the volumes of Buy and Sell positions equal.
- Change Virtual Stop Loss.
- Set SL of each position to the opening price of the position. In the field – the value of the SL offset from the opening price of the position.
- Change Virtual SL and TP.
- Remove TP and SL for all positions.
- Set TP and/or SL to the common level:
- Buy SL TP– set TP or SL of Buy positions to the common level.
- Sell SL TP– set TP or SL of Buy positions to the common level.
- All SL TP– set TP and SL of Buy and Sell positions to the common level.
- Distance between TP Buy and SL Sell or TP Sell and SL Buy (only for the All SL TP button).
- A label with a line indicating the level at which Stop Loss or Take Profit will be set. Displayed after pressing the 5 button.
How to reverse positions
How to lock positions
How to set stop loss of each position to the breakeven price of the position (the opening price of the position).
How to set Stop Loss or Take Profit of positions to the general level
To set Take Profit or Stop Loss of Buy positions to the general level, click the Buy SL TP button. Move the label that appears on the chart to the desired level and click the Modify button.
To set Take Profit or Stop Loss of Sell positions to the general level, click the Sell SL TP button. Move the label that appeared on the chart to the desired level and click the Modify button.
To set Take Profit of Sell positions and Stop Loss of Buy positions, or to set Stop Loss of Sell positions and Take Profit of Buy positions to the general level, click the All SL TP button. Move the label that appeared on the chart to the desired level and click the Modify button. If necessary, set the indent between Stop Loss and Take Profit in the field 6.
To change the virtual Stop Loss and Take Profit, enable the checkbox 4.
Panel for Risk Manager and Trading Report
Trade report
The tab is intended for analyzing trading results.
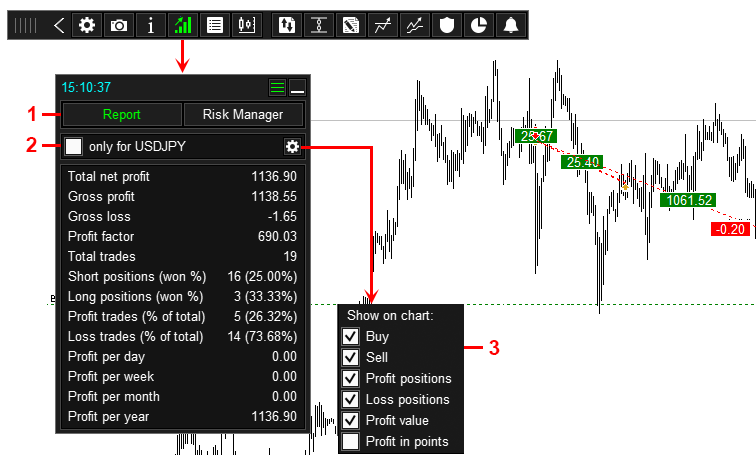
- Tab Trade Report.
- Show report only from current symbol.
- Show results of closed trades on chart.
For MetaTrader 5, the trading report is generated based on the entire trading history.
For MetaTrader 4, the trading report is generated based on the list of closed orders from the Account History tab of the Terminal.
Risk manager
The tab is designed to control the risk on the trading account.
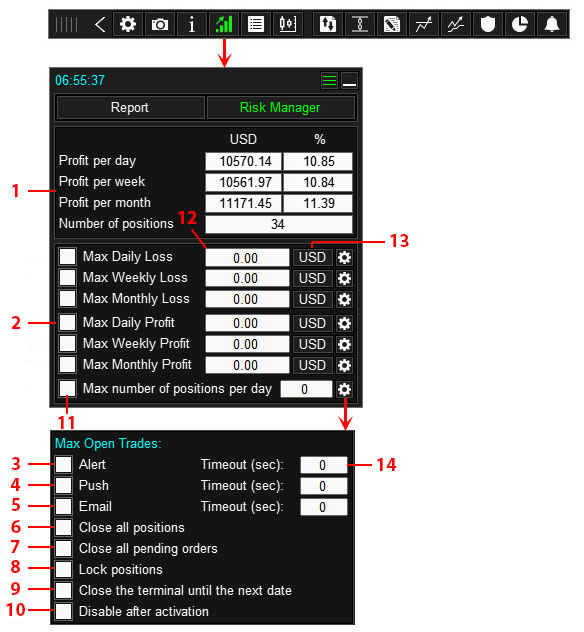
- Current profit in the deposit currency, in % of the balance, and the number of open positions on the current day.
- Conditions for activating the risk manager.
- When the condition is activated, display a message on the chart.
- When the condition is activated, send a notification to the mobile terminal (smartphone). *
- When the condition is activated, send a message to EMAIL. **
- When the condition is activated, close all positions on the trading account.
- When the condition is activated, delete all pending orders on the trading account.
- When the condition is activated, lock all positions on the trading account (open additional opposite positions that will equalize the volumes of Sell and Buy positions).
- When the condition is triggered, close the terminal and prohibit its opening until the next date.
- When the condition is activated, perform all enabled actions and disable the conditions (apply the action only once).
- Enable the risk manager condition.
- A field for entering the Profit (Loss) amount, upon exceeding which the set risk manager action will be activated. In each field you can enter both a positive and a negative value (with a minus sign), and the entered value will be used as is.
- Button for switching the unit of measurement of Profit (Loss) (in the deposit currency or %).
- Frequency of sending messages. If the value is 0, the message will be sent 1 time.
For mt4 here.
For mt5 here.
** This type of notification requires additional settings in the terminal. You must allow applications to send email and provide your email address. Where to set it up:
For mt4 here.
For mt5 here.
How to install risk manager
- Select the conditions for activating the risk manager 2 and go to its settings.
- In the settings, specify the action that the panel will perform if the condition is activated 3-9.
- Enable checkbox 10 if the risk manager should be used only once (after activation and execution of the action, the risk manager for the selected condition will be disabled).
- Enter the value upon reaching which the risk manager is activated 12 (if you enter a negative number, enter it with a minus sign).
- Enable checkbox 11.
Panel for OCO orders
The panel is designed for placing OCO orders.
OCO orders are two pending orders interconnected by a mutually canceling function: when one order is executed, the second order is deleted.
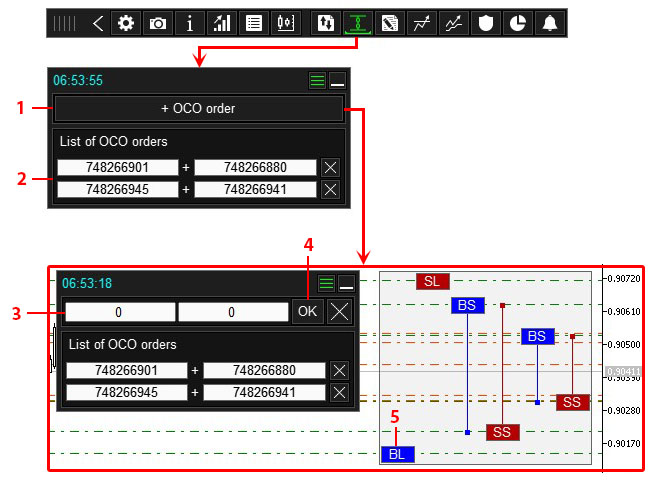
- Button for creating an OCO order.
- List of installed OCO orders.
- Fields for entering order tickets that will be linked in the OCO order.
- Button for installing an OCO order.
- Order labels.
How to create an OCO order
- Click the “+OCO order” button 1.
- Enter the ticket numbers in the fields 3, or select orders using the labels 5 (click on the labels of the required orders).
- Click the OK button 4.